
BOL : Business Object Layer.
Using the BOL and its uniform application programming interface (API) to access business
data offers considerable advantages compared to the various APIs typically available for
business objects:
1) The object-oriented BOL API is simple, uniform, and easy to use.
2) The built-in buffer accelerates your applications.
3) You can isolate your programs from any interface changes in the underlying business
object-specific APIs.
4) Development of SAP CRM applications is easy since the BOL has been designed to work hand-in-hand with the UI parts of the
CRM WebClient UI framework.
It is possible to enhance the BOL to cover business data not yet supported. After the
corresponding business objects and query services have been modeled and implemented,
you can use them at runtime.
Usually we are not need to build a BOL object. We will end up changing the existing BOL. I came across a situation that I need a screen for a component and create a screen for add/ modify and search the Z table.
In this post let us see how we create a custom BOL object for a Z table. Once this bol is create we need to add this bol in the custom view and show that on the screen. For now let us see how we can create a custom BOL.
Let's create a z table . See the following screen shot for the table.

Let us use this table and create a bol for this table to add,modify and search data.
OK. Now we need to define two tables. One for the data elements that we are going to use in the BOL and another for the hierarchy of the data element that we are going to use in the BOL object. Once these table are defined then we need to mention the class module that we are going to use for the BOL object. All these information are configured in the spro for this bol object.
See the following screen shot.

In the above configuration if you enter the Basic setting you will see all the BOL object defined here.
OK for our custom let us define the bol object as ZBOLOB.
See the following screen.

Now select the component Definition(the first one) and click on the new entries. Let us define the BOL component and add the details.
See the following screen.


See the following screen shot.

We need to give one implementation class and two tables one is Object table and another is Model table. Now let us create all these object.
One important thing with creating the implementation class is you need to specify super class for this implementation class and redefine specific methods.
For Creation a record, editing the record (modify) and for Searching you have redefine specific super class methods. While creating views (insert, edit and search) you need to specify specific Super class(not the methods).
See the following screen shots.
ZBOL_OBJECT table .

and ZBOL_MODEL table

Now we need to define a check table . See the following screen shots.
 don't forget to Activate your tables .
 Now let us create the data structure and add the structure and the data structure model in this BOL object tables. For this example this is a plain simple data structure and I am going to add the hierarchy for search.
See the following screen shot for the structure.

Now add this information in the BOL object Tables. Look at the following infomration I entered in the table. Always the object table needs to have a root object and the other object that are associated to their parent. Here all the object are associated to the root. If you have complex hierarchy then it takes time to do the correct design and come up with the information. Always try to see the existing code in the sap component and try to use that , this way it will be always easy to follow.
See the following screen shot for the data.

 In this example we have only one relation ship and all the result and search structure belongs to the root node.
Now let us create the implementation class for this BOL.
go to SE24 Transaction Create a new class ZCL_OWN_BOL using the class CL_CRM_GENIL_ABSTR_COMPONENT2 as super class. This is very important. If you didn’t inherit that super class they BOL object don’t understand your z class module. See the following screen shot for the bol implementation class module creation.

Now you need to redifine the methods from the super class. Because we are planning this bol object for search let us redefine all the methods that are associated for search.
See the following screen shot.
 Now you need to change the code in all the above method to fit your bol objects. First let us put our bol tables in this Get_Objects and Get_Model. See the following code cut and paste in the right methods.
METHOD if_genil_appl_intlay~get_dynamic_query_result.
DATA: lr_object TYPE REF TO if_genil_cont_root_object,
lt_result TYPE TABLE OF zusr_bol_st.
FIELD-SYMBOLS:
SELECT * FROM zusr_bol_tb INTO TABLE lt_result.
LOOP AT lt_result ASSIGNING
lr_object = iv_root_list->add_object( iv_object_name = 'Root'
is_object_key =
CHECK lr_object IS BOUND.
lr_object->set_query_root( abap_true ).
ENDLOOP.
ENDMETHOD.
METHOD if_genil_appl_intlay~get_objects.
DATA: lr_object TYPE REF TO if_genil_container_object,
lr_msg_cont TYPE REF TO cl_crm_genil_global_mess_cont,
lv_name_obj TYPE zusr_bol_tb-bname,
lr_attr_props TYPE REF TO if_genil_obj_attr_properties,
l_result TYPE zusr_bol_st,
lv_name TYPE crmt_ext_obj_name.
lr_object = iv_root_list->get_first( ).
lr_msg_cont ?= iv_root_list->get_global_message_container( ).
WHILE lr_object IS BOUND.
lv_name = lr_object->get_name( ).
IF lr_object->check_attr_requested( ) = abap_true.
lr_object->get_key( IMPORTING es_key = lv_name_obj ).
SELECT SINGLE * FROM zusr_bol_tb
INTO CORRESPONDING FIELDS OF
l_result WHERE bname = lv_name_obj.
lr_object->set_attributes( l_result ).
lr_attr_props = lr_object->get_attr_props_obj( ).
lr_attr_props->set_all_properties( if_genil_obj_attr_properties=>read_only ).
ENDIF.
lr_object = iv_root_list->get_next( ).
ENDWHILE.
ENDMETHOD.
METHOD if_genil_appl_model~get_model.
SELECT * FROM zbol_model
INTO CORRESPONDING FIELDS
OF TABLE rt_relation_det.
ENDMETHOD.
METHOD if_genil_appl_model~get_object_props.
SELECT * FROM zbol_object
INTO CORRESPONDING FIELDS OF TABLE
rt_obj_props[].
ENDMETHOD.
*--------------------------------End Of Code-----------------------------------------------------
Now compile the code and let us go the the BOL browser and execute this object and see if this is working.
Go to the Transaction GENIL_BOL_BROWSER.
Now give the bol component name. Ours is ZBOLOB.
See the following screen shots.
 See the following screen shot for the records in the z table. Double click on the Search.
 you should see the Object browse and the dynamic parameter on the right hand side.
See the screen shots below.
 i added the following lines to my z table and here you can do the same as you want to add.
 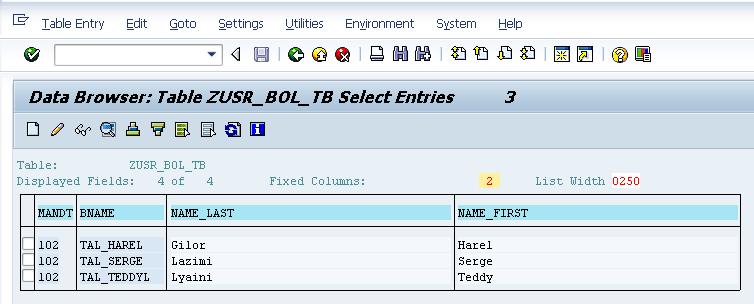 Remove the line in the dynamic Query Parameter using the – sign and click fine this will return all the records. Double click on the values and you will see the rows.
 See the following screen shots.
Now you just hit the find button and get the result from the search .
See the following screen shots.
 Once we got the results then this gives us that our BOL object is working.
Now if you hit the children button you'l get the predefined relation that we define eralier .
See the following screen shots.
See the following screen shots.

Now we can attach the BOL object to the View in the webclient component and we can create a search and result view.
Hi Harel,
ReplyDeleteThis is a very good post.
Any follow-up on how to use the BOL to enter new records or add an existing record to the table.
Dan
Hi Harel,
ReplyDeleteThis is the most useful blog that i ve read in recent days. Cheers!!
Regards,
Josh
very useful info ... Thanks
ReplyDeletethanks) it's useful
ReplyDeleteVery nicely explained
ReplyDeletevery clearly explained . Thanks for sharing this ..
ReplyDeleteThanks for Information SAP CRM
ReplyDeleteeasy to leran.Thanks for sharing
ReplyDeletecoding are very clear.Thanks for sharing
ReplyDeleteThanks for sharing this Information. SAP CRM Course in Gurgaon
ReplyDeleteCool Blog Post SAP Training in Chennai
ReplyDeleteSAP CRM Training in Delhi
ReplyDeleteGreat and I have a tremendous provide: How Much Remodel House old house renovation
ReplyDelete